Thursday, June 16, 2011

Buttermilk-Black-eyed Peas Salad

  I gotta say, it's been a hard switch for me going from cooking heart-warming stews, casseroles and dutch oven chicken to "no turning on the oven NO MATTER WHAT" dishes like salads, wraps and grilled foods. Why is that? I'm really not an expert on the grill yet. I usually leave that for the weekend when my hubby is home and it's kind of his domain. Gotta get in some practice! 
  
This is the perfect side salad for a hot day with summery vegetables like chopped cucumbers and tomatoes, and they add a nice splash of color and flavor to the dish. The buttermilk dressing is outstanding, and can easily be used for a green salad, noodle or quinoa salad. Have fun with this recipe!

The recipe is adapted from Ellie Krieger. You can check out the original recipe here.
Salad Recipe 
Serves: 6 Prep: 15 minutes Cooking Time: 0 minutes


3/4 cups buttermilk
3 TB mayonnaise
1 1/2 tsp honey-mustard or spicy brown mustard
1 1/4 cup apple cider vinegar
1/8 tsp hot pepper sauce
1/2 tsp salt
1/8 tsp black pepper
3 cups cooked black-eyed peas (or 2 15.5oz cans rinsed and drained)
1/2 cup red onion, diced
1/2 cucumber, diced
3/4 cup cherry tomatoes, quartered or halved
4 cups spinach leaves, lightly packed and cut into wide ribbons
2 TB chives, chopped (optional)  

1. Whisk together the buttermilk through pepper in a small bowl.
 2. In a large bowl, combine black eyed peas through chives.
 3. Pour dressing in 1/2 cup increments. There might be some dressing left over; you don't want the salad to be too soggy. Incorporate dressing gently, so the beans not get too mushed. Add spinach and toss to coat. Season with salt and pepper and more hot sauce if needed. Serve immediately. This salad will last about 2-3 days in your fridge, but tastes the best the first day. 

  ------------------------- 

Plan and Prep Ahead 

Here are some helpful techniques to make life a little easier once dinner time hits. These tips will especially help those that work full-time and don't have a lot of time to prepare dinner. 

~make buttermilk dressing ahead of time and keep in fridge until ready to use. 
~Incorporate beans with cut-up vegetables, and keep in fridge until ready to use. 
~Cut up vegetables ahead of time, and keep in fridge until ready to use.
------------------------- 

Who likes to CHANGE IT UP? 

~You can use a different bean like white beans or kidney instead of black-eyed peas.
~Add some cranberries for a different flavor.
~Try 1/2 tsp dill in the buttermilk dressing.
~Use different vegetables like celery, bell pepper or green onions.
~Instead of spinach use a mixed green salad.
-------------------------

Tuesday, June 7, 2011

Chocolate-Cranberry Power Bars

  These bars are so ooey-gooey delicious, that it is hard to just have one. Yes, they are a little on the messy side, but if you wrap them up individually in plastic wrap or parchment paper, it's not too bad. There is one ingredient in them that I don't use too often...brown rice syrup. Check out what it is towards the bottom of this post and where you can find it. If you absolutely can not find brown syrup in your area, you can swap it out with honey, but then omit the agave syrup so the bars are not overly sweet. 

The recipe is adapted from the 101Cookbooks Blog. You can check out Heidi's original recipe here.
Bars Recipe 
Serves: 24 Bars Prep: 15 minutes Cooking Time: 7 minutes

 1 cup walnuts, chopped
1 cup slivered almonds
2/3 cup (unsweetened) shredded coconut
1 1/4 cups rolled oats
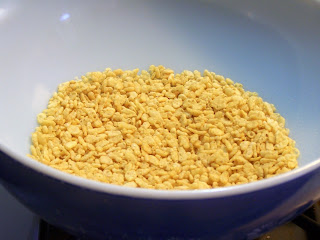
1 1/2 cups Rice Crispies
1 cup brown rice syrup
1/4 cup agave syrup 

1/2 teaspoon fine-grain sea salt
2 tablespoons cocoa powder
1 teaspoon pure vanilla extract
 
3/4 cup cranberries
Cooking Spray  

1.Lay out walnuts, almonds, coconut, and oats on baking sheet. Bake at 350*F for 7 minutes.
  2. Meantime, add Rice Crispies to a large bowl.
 3. Once oat mixture has toasted in the oven, add to Rice Crispies.
  4. Add cranberries to oat mixture.

 5. Add brown rice syrup through vanilla extract to a small saucepan over medium heat. Bring mixture to a boil, constantly stirring for 4 minutes.
  6. Add chocolate sauce to oat mixture and stir well together.
    7. Spray a 9x13 pan with cooking spray. Add mixture to pan, and flatten with the back of a measuring cup.
  8. Let cool to room temperature for about 1 hour or stick it in the fridge for about 30 minutes to harden. Flip pan over on top of a cutting board or use a metal spatula to cut into squares while still  in pan. Cut into 24 squares. Refrigerate indivudal squares wrapped in plastic wrap or parchment paper.


  ------------------------- 

Plan and Prep Ahead 

Here are some helpful techniques to make life a little easier once dinner time hits. These tips will especially help those that work full-time and don't have a lot of time to prepare dinner. 

~make oat mixture ahead of time


------------------------- 

Who likes to CHANGE IT UP? 

~Try adding flaxseed powder instead of coconut. 
~Add raisins, dried cherries, dried apricots instead of dried cranberries. 
~Replace espresso powder instead of cocoa powder for a different twist. 
~Use pecans, pistachios, or chopped hazlenuts instead of walnuts. 
~Substitute cane sugar with agave syrup. 
-------------------------
What is brown rice syrup?
 
Brown rice syrup is "derived by culturing cooked rice with enzymes (usually from dried barley sprouts) to break down the startches, then straining off the liquid and reducing it by cooking until the desired consistency is reached." ~Wikipedia You can find brown rice syrup at any natural food store or in some grocery stores in their natural food section. It's definitely not overly sweet like honey and has a much milder flavor. It does have a sticky texture that is similar to honey though, so you can swap it out easily in recipes.

Friday, June 3, 2011

How to: Make your own beans

  
When I first made stove-top beans, I was so surprised how easy it was and I haven't turned back to canned since. You will save a ton of $ making your own and you won't have any extra sodium or preservatives that you find in canned goods. With these super duper easy steps, you will find the benefit of making your own.  

1 pound of beans equals about 5-6 cups of cooked beans, which is the equivalent of about 3 cans of beans. 1 pound of beans usually costs me around 80 cents. Pretty good deal, eh? 

Now you are thinking to yourself, there is NO way we are going to eat a pound of beans in one sitting. You're right, that would be intense! There's a simple solution. Freeze your beans in quart size freezer bags. Measure 2 cups of beans per bag (that's how much is in a can) and freeze them. Then when you are ready to use them in a recipe,  just defrost them the night before in the fridge or nuke them in the microwave and Voila! Simple isn't it?  

There are 2 methods of soaking your beans. 

1. The longer method (I prefer this one), is by soaking your beans overnight. It slows down the cooking time and removes indigestible complex sugars from the outer coating of the beans. In other words, you won't be having as much "gas" after eating them. 

2. The shorter method does a "rapid" soak, and I usually do this if I forgot to soak the beans overnight. 


Long Method
Serves:5-6 cups Prep: overnight Cooking Time: depends on bean

1 lb of beans
water
 
1. Rinse and pick through beans. Throw away any shriveled ones.
2. Add 8 cups of water to a soup pan, and let beans sit overnight (8-12 hours) in the water.
3. The next morning, rinse out the beans. Add 12-16 cups of water to soup pan and bring beans to a boil then a simmer. Time will vary on the type of bean. I usually check and taste them after the first 30 minutes and then every 10 minutes after that. You don't want the beans to get mushy. You can add salt 5 minutes before the beans are done, but I usually don't to reduce on the sodium.

Note: If you are making Split Peas, Lentils or Butter beans, you do NOT need to soak them.

Short Method
Serves:5-6 cups Prep: 1 hour Cooking Time: depends on bean
  
1 lb of beans
water
   1. Rinse and pick through beans. Throw away any shriveled ones.
2. Add 12-16 cups of water to a soup pan, and bring to a boil. Boil for 2 minutes. Turn off heat and remove pan from heat. Let sit covered for 1 hour.
3. Rinse beans. Add 12-16 cups of water to soup pan and bring beans to a boil then a simmer. Time will vary on the type of bean. I usually check and taste them after the first 30 minutes and then every 10 minutes after that. You don't want the beans to get mushy. You can add salt 5 minutes before the beans are done, but I usually don't to reduce on the sodium.

 ------------------------- 
Types of Beans and Cooking Times

Black and White Beans - 30 minutes
Kidney and Pinto Beans - 30-45 minutes
Garbonzo Beans - 30-45 minutes
Lentils and Split Peas - 20-30 minutes


Note: If you have any questions just comment on this page and I will try to answer your question to the best of my ability. Hope this information is helpful to you!

Bow-Ties with Hazelnut-Broccoli Pesto

  This recipe caught my eye, because of one word in the title. Pesto! I LOOOVE pesto dishes. They are so simple to make, just throw a bunch of ingredients in the food processor, boil some pasta and you have a very satisfying meal. This meal was enough for 2 adults, 2 kids and my husband got to take the leftovers for lunch the next day.  
This is definitely not your usual basil pesto recipe, and has some fun ingredients like hazelnuts, lemons, mint and broccoli instead. Check the Change it Up section at the end for some fun ways to alter the recipe. Enjoy!

The recipe is adapted from Vegetarian Times. You can check out the original recipe here.
Pesto Recipe 
Serves: 5-6 Prep: 15 minutes Cooking Time: 10 minutes


6 TB hazelnuts, toasted
2 cups broccoli florets
1 1/2 cups parsley leaves, lightly packed
1/4 cup plus 2 TB olive oil
1/2 cup mint leaves
1 lemon, zested and juiced
4-5 cloves garlic, peeled
12 oz (.75 lbs) bow-tie pasta
Parmesan Cheese, grated (optional)

1.Toast hazelnuts 3-5 minutes. Set aside
 2. Boil broccoli 2-3 minutes. Remove with slotted spoon.
3. Add bow-tie pasta to the same water and boil for 6-7 minutes until tender. Reserve cooking water for pesto.
4. Add hazelnuts, broccoli, parsley, olive oil, mint leaves, lemon zest, lemon juice and garlic cloves to a food processor. Blend till smooth. Slowly add reserved cooking water 1/4 cup at a time, till the pesto becomes smooth and sauce like. Add to cooked bow-tie pasta and mix well together. Add parmesan cheese to individual servings.

 ------------------------- 

Plan and Prep Ahead 

Here are some helpful techniques to make life a little easier once dinner time hits. These tips will especially help those that work full-time and don't have a lot of time to prepare dinner. 

~Toast hazelnuts ahead of time.
~Cook broccoli ahead of time and leave in fridge until ready to make pesto. Heat up in microwave to warm up. 


------------------------- 

Who likes to CHANGE IT UP? 
 ~Add chopped/shredded chicken to the dish to add a little protein.
~Top with crumbled bacon for a yummy finishing touch.
~Instead of broccoli try cauliflower. 
~Use walnuts or pecans instead of hazelnuts.
-------------------------

LinkWithin

Related Posts with Thumbnails